
-
Starting the blog over

So I lost access to my previous blog. I had a company phone for 20 years and they allowed personal use, so I never got a personal cell phone. I was happy, used two stage authentication for my access and all. Someone offered me another job with more money and I left. I had to turn in the phone and thought I removed all the security associated with the old phone. Nope, it texts that number and the new user won’t respond to help me remove it and change it.
So I am starting over on WordPress, since I got locked out of my account. All the stuff I used to post to this blog in my past years and can found and read here. https://archeryrob.wordpress.com/ and maybe I will copy it over here. One day when I am bored, maybe, it is raining and I can’t hunt, fish or work on something.
If you are interested in archery. I used to be obsessed with making bows and arrows when younger. I found that there was pretty good information on bow making, but a lot of very poor information in books and posted on like about making quality arrows. I stared writing a book. I found I was contently adding to it and self publishing was going to be more work than I felt like dealing with. SO I posed it on a blog. You can read it here. https://boweyrsden.wordpress.com/
My most popular post was making the Coolbot clone and deer cooler. My buddy Kevin wanted to build one and i got to design it and make it work. https://archeryrob.wordpress.com/2017/11/07/deer-cooler-with-a-diy-coolbot-clone/
Next is the smokehouse that people like. I just got the itch to make one and I did. The collection of posts can be found here. https://archeryrob.wordpress.com/category/smokehouse/ Someday I plan on knocking down the fire box and make two stacked vaulted ovens. Bottom for the smoke house fire and top for a brick oven.
The lure making stuff got popular as I made templates and guys could download and copy them. https://archeryrob.wordpress.com/category/lure-making/ That all kind of fell away as I can only build so many things, have so many hobbies at one time. I still need to work, fish, hunt, tinker and of course carry out mundane tasks for my wife and spend time with her also. I need to make for inline spinners, maybe that will get posted. I never posted that stiff before.
There was a time my daughter dragged me into chicken raising. I got into chickens until it became a hassle do it all when she was “too busy” all the time. So I gave mine up and then had to get rid of hers. Maybe I’ll do them again when I have ore free time. My wife likes them as pets and doesn’t like to think of them as food. Making having them counter productive. https://archeryrob.wordpress.com/category/chickens/
Canning The few things i canned. https://archeryrob.wordpress.com/category/canning/
Most of my Wild Game cooking recipes are listed in this search section. https://archeryrob.wordpress.com/category/cooking/
Then there is the kayak section. Kayak general, Kayak Fishing and Kayak Hunting
Archery, Black powder, Hunting, Knives, reloading, shooting, and that is about it for now.
Stay happy Enjoy!!!!

Kako and me in her younger years, as she stares off listening to geese in the distance. -
6.8 SPC Ladder failure with 4227

My previous post on designing a ladder round set for 6.8 SPC was a complete failure! I came at designing the ladder set just as I would for for a bolt gun, or a lever gun. Then I also essentially turned my AR15 into a pull action gun. The gun would not cycle and it seems IMR 4227 is not the best powder to use in an AR15.
I went with it from reading people casting bullets for 223 using it. The Lyman Reloading manual lists 223 cast bullets and that powder is one they tested and listed for use. I wasted a lot of time, powder and lead to find out 4227 might send bullets down range well enough, but it will not cycle my AR15!
So frustration hits and its too early to give up and start drinking beer for the day. So I look a little on the forums and See the 6.8 SPC forums has some data for H335 being used previously for people pushing larger bullets as I am. I jump into the truck and head to the gun stores. I get to my first and favorite store for powders, RSP gun shop in Falling Waters, WV and they closed up already on Saturday. Damn, off to Hafer’s, my second choice. I get there and they are more limited on powders as they sell guns and ammo more. They did not have anything like H335 and their powders were $50+ a pound. <shock> Damn stuff is expensive. I gave up and went home.
Dejected and not knowing what to do I head back home. The beer will console me if nothing else works. On the way home the wheels keep turning and I think, I have IMR 4198 that I used for 30-06 and IMR 3031 I used for 30-30 sitting down there on the shelf above the bench. Let’s check the reloading software and give it a try. I have primed cases and free powder. The worst case, it doesn’t work and I am already there with 4227, which I thought was going to work.
My initial load calcs I looked at lighter bullets and 3031 and 4198 gave me low burn rate warnings. During the shortages during the Covid hysteria, I impulse bought 2 more pounds of 3031 as I was low from making the loads for 30-30. I have a bunch of that and lets see what GRT has to say about it (Gordon’s reloading Tool). I check everything in GRT before trying it and to know what loads are safe and check seating depth and everything.

Above is the entire screen you can see in GRT and I have it set for 26 grains as the top end and drops of .25 grains for 10 ladder steps. I’ll show some closer pictures below.

Above is the specs for the top round at 26 grains, a chamber pressure of 52,781, muzzle velocity of 2270 fps, and energy of 1602 ft lbs. more than enough to kill deer or that sized targets.

Here is the graph of the burn rate. As you can see there is room in the burn rate for more powder. The picture above talks about a “pressed charge” warning. I can tell you personally with Starline brass that 26 grains of 3031 is the absolute maximum I would try. Measuring the loaded rounds and my OAL is 2.24 and the 26 grain cartridges are coming out at 2.242. Lower loads are coming out at 2.24 or 2.238. That means the powder is filling the casing up and I will need to compress the powder with a higher powder charge to get the bullet in. Maybe with the luck of ruining the gun and or me! Even though the software graph is showing there is room to burn more pressure wise. It gives me a warning of a pressed charge as case volume is at maximum or close. Pay attention to these kind of things!!
So I loaded one cartridge with 26 grains, seated the bullet, crimped it. Then in a Duramag and into the Ar15 and pointed it at the hill. With low expectations I pulled the trigger. Bang and we have lock back! I was so excited! after all this failure, I got a powder to cycle the AR15. I was so excited I forgot about having a beer and ran right to the Reloading bench.

As shown above, I learned my lesson about loading a ladder for a semi-automatic gun without testing what will cycle the gun and what will not. Using the kinetic hammer to unload a bunch of cast bullets and removing all the stuck gas checks in the case necks will help reinforce being stupid the second time!
I built a ladder sheet, but only loaded one cartridge per ladder step for a cycling test. I don’t care about grouping here, I care about what cycles the gun. Then later I can make 5 rounds per step and see about grouping once I know what cycles.
I started putting the lowest 24.25 grain cartridge in the mag first, so it is the last shoot. Then progressively stronger on top, one by one. The most powerful at 26 grains was on top> the last round to cycle will be the bottom step of the ladder. They all cycled, except for one jamb in the line.
You can watch the test in the video below. Enjoy, ladder testing to come shortly as i have time. My daughter has been moving and Turkey season is coming.
-
6.8 SPC PSA gas system failure

I ordered a PSA 6.8 SPC upper last year as I wanted a larger bullet and a better shooting platform for my AR15. The 556/223 is okay, but it really is a varmint round. It could kill deer, or men, if needed, but it is not the best round for doing that application. I know the US Military has been using it for years, but even they are looking to upgrade to the 6.8 Fury and the AR10 supposedly.
It all started with the first shooting of my upper ladder round set. I did not record any of that, or save anything of it, as it was a complete failure. You can read the premise of it here, but basically, you need to determine what rounds will cycle in a semi-automatic firearm and not just load any rounds/powder.
I had read some people post where that .223 performed really good reloaded with IMR 4227 and I thought I would go with that. It is one of the powders listed in the Lyman Cast bullets manual. I guess that is all well and good, but 4227 would not cycle the action in my AR15. More on that in another post. We are covering the failure of a brand new rifles gas system.
So I reached out on Maryland Shooters forum for help. Actually it started as “Look, I’m making a new ladder” and went downhill rom there. It turned into “how did I mess up so bad”! My life, I always want to try new things and experiment on my own. Sometimes you learn great things and some days you trip and fall face first into a pile of poo!
My buddy Byron, reached out to his buddy Pete to see if he would help me. Pete is an Armorer for a local police department and repairs guns professionally and as a hobby. Pete said use factory ammo. I did not and still no cycling. I opened PSA’s adjust able gas block from 7 clicks, as they had it, to 15 clicks and fully open. The gun would still not cycle.

So above is an adjustable gas block. It catches the barrel gases from a hole drilled in the barrel and sends it down the gas tube to unlock the bolt and push it back. There by ejecting the casing and loading another cartridge. Adjustable is used as if you add a silencer it would increase the gas on this tube and you can choke it down more. Shooters refer to this as over gassing. I am not adding a silencer and did not ask for this, it just comes this way. PSA probably just throws it in to avoid problems when people decide they want a silencer. “Adjust your gas block” is an easy defense to an upset customer complaining their gun is over gassed because they added a silencer and did not know better.
The first day Pete looked at it he changed the buffer weight and spring in my lower. He said the PSA kit I used looked okay and seemed to spec, but he just was not sure about it. He thought the spring and buffer might be cheap. I brought it home an shot it the next day. Three shots of factory ammo and still no chambering the next round, no lock backs and just weak ejections, if it did eject.
Back up the next night to see Pete and thought this gas block could be the problem, as in his words, many of them are if the buffer is not causing it. So he swapped mine out with a open one. I brought it home an shot it the next day. Three shots of factory ammo and still no chambering the next round, no lock backs and just weak ejections, if it did eject.
The third night at Pete’s and he says we are changing the Bolt Carrier group, as it is the only thing left. He changed the Bolt carrier and Carrier Key as shown below, but reused my bolt as all his are .556 and mine was specific to 6.8 SPC.

When Pete first checked the gun out he pulled the Bolt Carrier Group and checked it with his gunsmith gauges. He has gauges that check the Carrier and the Carrier Key. The Carrier was not perfect, but he didn’t think that was a problem, even though it was loose. The Carrier Key gauge has two gauges, a green and red one. Mine took both and it is only supposed to take the green one and red is a failure. Pete said he’s seen guns with 15,000 rounds through them where the carrier Key will take the red gauge and still work, but never a brand new gun.
Also, when we disassembled the PSA bolt group and removed the Carrie key. We noticed the heavy oil that was applied to the Carrier group got under the carrier key and between the carrier and it. It was clear to see the oil that was near where the gas was coming in the carrier was blown away and out the sides. So the gas was leaking there and loosing pressure enough to cycle the action.

Above the red line shows the inflow of the gas to the Bolt carrier group. This one was leaking where the key connects to the carrier. Leaving enough gas to unlock the bolt, but not enough to push the carrier group back far enough to operate correctly.
Now, even though I am/was disappointed with PSA for this gun not working, you get what you pay for! They clearly have cheap uppers and they have premium rifles as shown in the red highlight I made from the screen shot of their website. I choose a cheap upper and will buy premium or build it myself next time.

I became interested in the cheap price and I got a cheap upper I needed to fix. That said, they do not have any Premium Uppers except in 556 and 300 Blackout and I wanted one of the off the wall calibers compared to what the general population is looking for. I got an upper for $450 and dropped another $100 fixing it. Plus the time and trouble, I should have bought a better upper or built one myself.
The lesson here is buy a cheap upper and you get a cheap upper. Buy a premium upper and you get a premium upper! the wisdom I have right? You are welcome.
Enjoy! Try to avoid falling in the same hole I did.
-
9mm Cast hollow point reloading.

This is a video covering the process and details I use for reloading cast hollow point bullets.
-
Powder coating Pistol bullets

I learned a great lesson. You never learn so good as when you mess up and have to redo it all. That helps you remember and learn the lesson so much better. You forget your mild successes in to obscurity. It is the pain that lives on and gives you really teachable moments.
I have been experimenting with half/half allow for hollow point s in the 9mm and really like its performance. It expands great and still hangs on to accuracy good enough and closer ranges. I can’t shoot a Glock or P365 farther ranges to matter if the ammo is accurate, because I am not. Farther than 20 yards with those, I better have my rifle or my 1858. I mixed up a pot of alloy and started casting. Casted a pint of bullets and powder coated them.
Here is where it goes south. I tried the ice cube trays I use for rifle bullets. Now they worked good for rifle bullets, but I did double stupid here. I picked the bullets out of the shack and bake container with tweezers, without running them through a sifting tray. They probably had too much powder flowing.

Above you can see some of the problems. Too much powder caused it to flow even more and even made some wings of powder on so bullets with bare spots where they touched the sides o the trays. Oh, look at the covering on the Eastwood Grape on the right. I don’t know if the powder comes with moisture in it and needs drying but this crap did not stuck like the humidity was high and it would hardly stick to the bullets. I tried twice and couldn’t cover them. Not sure where the failure was with this powder but it looks great, but covers terribly. It is a shame, because it would look beautiful if it stuck.

Here is a close up of some of the problems the too much powder on the bullets and left me. Then I powder coated the extras in a wire basket. I did not take pictures but I had bare spots where the tray wire was, where the bullets stuck. They might have shot okay, but they looked like inferior product to me and I did not want my name on them.
So I second coated them, without sizing them first. When I sized them, they were not terribly hard to do, but they pulled like little lips on the base toward the powder and where sides were weak, it just opened them up. Now I took good bullets and ruined them powder coating them. So this morning I melted them all down, skimmed off the floating powder coating and started over.

This time I spun them in the Tupperware and dumped on to a sifter tray I made of hardware cloth. Then picked them out with my tweezers and set them on my 9 x 7 tray that I bought to fit in the toaster over. I lined the tray with parchment paper. Then into the toaster over for 20 minutes at 400 degrees.

This is the way!! It takes longer to set them individually on the tray/parchment paper, but what an exception product is delivered without missing spots and holes. This is how all my pistol bullets are getting baked for powder coating going forward.


The sides will smooth down once run though the sizer. They are cast .359 and added with powder coat and them get sized down for 9mm. These are perfect!
Enjoy
Here is a video on my thought on the best way to powder coat bullets. Quality over quantity.
-
6.8 SPC designing ladder rounds and loading

I have my upper, magazines and finally found some casings to load. Finding casings have been the largest problem with this round. I love Starline and using their casings, but I have had 250 on back order since Thanksgiving and 2.5 month later they are not being made yet. I found Starline 100 packs on Gun Broker and ordered 200. The seller was Marksmen Reloading and he got the order Friday, shipped them Saturday and I got them Priority mail Monday or Tuesday. I was very happy with the service. Now to designing the ladder rounds.

Above is a shot from the GRT software (Gordon’s Reloading Tool) and you can find it online and join the Discord group. Gordon died and I do not know if they group still supports it the same, but it is still around and still works. It is free and I love it. I made marks in red for what I pay attention too. I will blow it up better so you can see the points better.
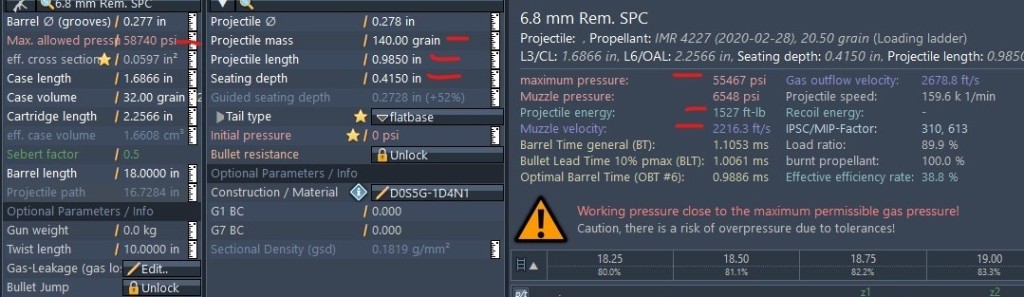
On the left you see Max Pressure. Then in the middle Mass, length and seating depth are very important tot he calculation. I can’t really figure these out until I have bullets in hand and check them for OAL with dummy rounds in the chambers. The max pressure for the load, energy and muzzle velocity and they get recorded on my excel charts.

On this zoom in of the screen You set the powder type, amount of powder and steps and their size. I used 10 steps and sized them at 1/4 grains. I worked down 12 steps and recorded it all. The last two have warnings and should fire fine, but I can skip them and pull the bullets if I am happy before that and not wanting to try them. I can check for over pressurizations on cases with those and if they show it and shoot well, than that is still a failure of the round.

As you can see above I check many casting popular powders in GRT. I am not going to list all the details but I recorded the poor efficiency some of them have. I think some work for cast, but don’t like the smaller cases and need larger ones. I use 3031 for 30-30 and 4198 for 30.06, but they threw low burn rate warnings. The best for this cartridge were 4227, which I used, N120, H110 and Reloader 7. If you trip over this looking to reload cast for an AR15 for another round, one of these might work for you also.

Above is my reloading ladder chart. Yellow marks where I am getting into questionable loads where I was warned. There is not much change from 2171 to 2216 and if they first one, or couple, 2194 fps show anything off the ladder is over.

Then my field chart to be recorded the groupings and load boxes with X’s get trimmed out and stuck in my MTM boxes to keep track and what load is where without using sharpies on cases.

The above 223 on top with a dummy round of 6.8 SPC for checking the OAL that will work for this bullet. I went with 2.24″ as the OAL. It feeds from the magazine, chambers and no lands scratches or marks.

Above I use the RCBS Hand Priming tool. I use a single stage press and do not like priming on it. I like hand seating and feeling each primer. I check each one coming up the chute as I have had a small primers try and turn sideways or upside down.


Next is belling or flaring the case mouth to accept the cast bullets. I use the Lee Precision 90798, Universal Neck Expanding Die and found I like it better than the M dies I used for 30-30 and 30-06. They are much more aggressive and I have ruined cases setting them up with just too much of them making the case look like a trumpet. You can’t see the flaring in these small pictures. I can’t zoom in on it either as it is too pixelated. You can feel it as much or more than see it. Too much and you are stressing the brass too much. Not enough flaring and you will scrape powder coating off the side of the bullet and you’ll know it is worng.


I removed the larger flaring ramp and just the small one as shown on the left. The S for small size for 25 – 33 caliber and 1.5 – 3 inches. I was remarkably happy with this die and now feel I wasted money buy the M dies per caliber.

I use my 100 spot home made loading bleacher for this. Pulled and primer set and replaced and grab the next one. Same with the flaring the mouth.

Then as powder is being dropped in the cases and I use the Lee Precision 90058 Perfect Powder Measurer for do all my measuring. I don’t use one of those fancy droppers, but I check each case on rifle loads. Here I am doing the 19.25 grain load and 5 for the ladder and 20 for scope zero and extra play rounds.
The case is pulled form the bleacher, set on the scale and zeroed. The filed with powder and checked. if this comes back under 19.20 or over 19.30 the powder is dumped in the pen powder bottle and filled until close enough for correct loading. Then is is sat in the MTM case as you see the open mouthed cases.
Then they will be pulled one at a time and seated in the press to 2.24 or just under and checked with the calibers and set back in the MTM Case. Then they are pulled one at a time and crimped and set back. Then grab the next cartridge and so on until all are finished and completed.

above are the finished ladder rounds ready to go to the farm field for shooting at 100 yards. The left 20 yards are zeroing round and play time later. everything seen on the right is the ladder steps. I will post each target after I run the ladder and have time to analyze it all.
Enjoy!
-
6.8 SPC selection and casting bullets

I wanted to start casting bullets for my AR15 and I always go for heavy bullets as I am a shorter range shooter and never bothered with 300+ yard shooting. It is to hilly around here to see that far most times, so I never bothered. As such, when I bought my 5.56/223 upper I went with the 1:12 twist and not the 1:7 which would be great for larger, jacketed bullets. Once I started going to cast it seems 1:7 and 55 grains is the best route. I may still try a heavy, hollow point, mold in the future. It will be a when I have nothing else on the radar kind of thing.
So the search started search for what cartridge I wanted to get an upper for to replace 223 and cast for myself. This was for a SHTF caliber that packs punch and can defend you at medium engagement distances. I love my 30-30 as the sights are never off, even when dropped, but only a 150 yard gun and it is slow to reload and holds 5 shots. My 30.06 fits all my 200 -300+ shooting even with cast, but is hard to reload fast. I wanted something for the AR15 for semi-automatic fire and easy reloading.
I have a love for 30 caliber and that was my first looking on cartridges’. Then looked at other and thought they are too small or other problems and I’ll list why in the below paragraphs.
The first look was 7.62×39 and it is a proven battle round. It had the size and probably would work good for cast as I wanted. It did not look any better than 300 Blackout in supersonic. I read a lot of about feed from magazine problems in the AR15 and I saw it enough I figured I would just pass on this cartridge. I think of this as a upper for cheap surplus ammo as the main reason only. Maybe just by and AK or SKS then
Next was 300 blackout and I came very close to ordering one. I liked the bullet but mainly I saw this as a cartridge designed for suppressed rounds mostly that could be adapted for supersonic shooting also. This partially pushed me away and there were two other reasons. The first and most reason was reading about people inserting a magazine of 300 blackout into a 556 and the rounds will chamber and fire, but the bullet won’t leave the barrel. All rounds won’t chamber, that is only on bullet fit. If the bullet fits the 556 chamber, you got a bomb. My wife and daughter don’t pay attention to this and I could see anyone making this mistake in a panic load situation. The second was at 200 yards even supersonic was starting to drop like a amped up 30-30 and I wanted 300 yards of possibilities.
Next were all 224 Valkyrie, 6mm ARC and 6.5 Grendel. The first two are smaller than I wanted and the Grendel was bigger. All three are screaming rounds and you would loose a lot of that characteristics of the cartridge heading to cast bullets. This is like buying a Ferrari and installing a governor so it can’t drive fast. Then why did you get it and not a car that went the speed you want to drive? I’ve seen the Grendel in action and like the cartridge. My daughter owns an upper and shot a buck with it. She shot in the very bottom of the rib cage on a moving buck. Lower than you would be happy with normally. When gutting the buck the shock of this round was clearly evident. His heart was split from the bottom to the top and the bullet missed his heart! Velocity kills, but using this and going cast would rob a lot of its velocity.
The next one was the 6.8 SPC and of course the one I decided to go with. The first real good thing I saw was the US Military almost adopted this as a replacement for 5.56. They wanted a larger bullet with more hitting power and this was considered. They didn’t need to change but barrels, bolts and magazines. They might really have if Remington did not screw themselves, and the cartridge, by presenting the platform before they finished designing it!! The cartridge we shoot now is called the 6.8 SPC II. Even though no one calls it that and they don’t sell the 6.8 SPC I and you can’t get one unless you find one of those first mistakes. They had the rifle chamber designed wrong and it threw way too much pressure and made the round borderline dangerous. They redesigned it, but the Army already had seen the first one and got a sour taste. It is hard to take somethings back once tossed out in front of prospective buyers. It was too late for the 6.8 SPC to still be considered.
The 6.8 SPC has a close follow on the Grendel up to 300 yard for smaller bullet profiles, but looses to it at 400 and 500 yards. At 100, 200 and possibly 300 the 6.8 has larger bullets and does just as well. Plus reading about the love for it down south. It is starting to become one of the most popular pig killing cartridges. Plus the mags I was going to have to buy would also work for 224 Valkyrie if I wanted a speed demon for smaller jacket bullets

Above we see the 6.8 SPC (bottom) next to a commercially loaded 223 70 grain hollow point rounds. The mold is for 125 grains for the 6.8, but my allow cast heavy and I am getting 139 with powder coat and gas check added. This 6.8 case doesn’t have a primer and is not crimped as you can see. I was using this dummy round to check OAL at 2.24

I picked my mold and I was looking between MP and NOE molds. I like both and own both, I just really like MP as they are cheaper, have more hollow point molds and they sell brass molds and I really like brass over aluminum molds. Brass holds heat longer and you just settle into a little rest between pours and I get better bullets. Maybe it is just me, but it works for me. I bought the MP 278-125 Solid Mold in 6 cavities. I like that is has the break handle. I determined a long time ago I liked the Lee 6 cavity molds because of the break handle. My 4 cavity 359 hollow point mold for 9mm takes some whacking on the sprue plate to break it loose. The break handles just make things easier.


The bullets we cast and dropped into water to harden them for rifle shooting. I cast wheel weights at 10-11 bhn and probably get to about 14 – 15 bhn from the water cooling.

I cast over 9.6# of bullets and I figured out powder coating it was over 500 bullets.


Above is one bullet, of the many I checked. We want a .278 finished bullet and we will have plenty of size to reduce one powder coating add some diameter.


The bullets above are spun in a Tupperware container and have a small amount of Eastwood Hotcoat Powder Coat Lime Green added to the container. I use the 6.2 cup round containers, but you can use what you want. I spin it in a circle with two hands. It doesn’t take a lot of force and work. Maybe a minute or less of spinning. The Tupperware is useless for anything else after this. The bullets scratch it up and powder sets in. The container probably works better after a couple uses as more friction makes better static. Remember, 40% or under humidity for dry shake and bake. high humidity consider the wet coat method and two coating them.
These are the ice cube trays I use and they work good for .278 bullets. I have not tried them on 30 caliber yet. They release power coat fairly easily and they keep the bullets upright. These things get hot and stay hot! The metal rack in the toaster over cools of faster so watch these things for a few minutes after they come out of the oven.
I messed up here and need to relay this. I picked the coated bullets out of the Tupperware container with my 8″ tweezers I use for reloading and black powder. They had too much powder on them and made the coating thicker than it needed to be. This crushed the driving bands a little more, but nothing really wrong, just not right. They still need to be dumped out and sifted before picking up with the tweezers to go in the trays. They can have extra powder clumped to a side without shaking and sifting.

Here they are coming out of the toaster oven in the garage and aren’t they beautiful! Then dumped into a bucket of water to gain some of the hardness back. The bullets are basically annealing like a knife while setting the powder coat.


So dumping them in water gains some hardness back (Left) and keeps them from sticking together. Even if in the trays and dumped on a towel to air cool, they will stick together if allowed to touch each other.


So next was adding gas checks and sizing the bullets to .278″ as shown on the left. This is where the thick coat I spoke of was a problem. These were tough to size and a few bullets got ruined scratching off powder coating on the bands and went to a bag to make future bullets and get melted. Not a pretty as I would like, but that part will work fine and goes in the case to never be seen again.
Also, guys on the message boards are like, test your powder by hitting the bullet with a hammer. If it flakes off it is not bonded. I guess they meant hit it with a 16 oz hammer with medium force, they weren’t very clear about technique. I set the left one on my railroad track anvil and hit it with 3# hammer like I was smithing a knife blade. <shock> Yes, that is too much! I hit the right one with a 16 oz hammer with a milder swing. Yes, I can be a brute, if not told finesse is needed. Good news is all powder coat stuck.
Next, designing and loading the ladder rounds to test these for the best load. Enjoy!
-
Late Muzzleloader buck

This year I did not hunt a lot. I was focused on other things like paw paw in September and I was just distracted in early bow with reloading. I really did not hunt a lot and I setup for early muzzle loader with my new Accura rifle as shown in other posts here. Then I went out opening morning and shot a doe in the morning for a friend and then an 8 point in the afternoon. After that and hardly hunting and shooting an 8 point when just looking for a doe, I felt like I did everything I needed and lost interest.
Opening day of Rifle came and I wanted to put my new hand loaded and cast 30-06 rounds to work, but I was sick and just stayed home to not get worse. The second week the deer are all hiding or being out more at night, so I waited a week for late muzzle loader when deer would settle down from lack of men in the woods.
Opening Saturday for late muzzleloader starts and I go sit in the bedding stand. It is over the crest of the hill from the access trail and bucks like to cruise through from the east or come in from behind me to look for does. Does usually come in around me from behind or in front to get to the bedding area. I just want more meat in the freezer and planned to kill the first mature doe I see and later look for bucks.
After a while I hear the turkeys headed my way. Then I hear walking behind me and a yearling heads to my left into the bedding area. I think “Where’s your momma!” and 5 minutes later no other deer walk through, so there is no momma deer to shoot. Then the turkeys get closer and I’m thinking, at least I won’t be bored and can watch the turkeys interact. I see about 25 turkeys and at least 6 of them are Gobblers with 6+ inch beards. They are raking the leaves and making a bunch of noise.
Then I see deer colors move in the bedding area nd think they yearling is still in with the turkeys. Then I see antlers and get excited. He walks through nose to the ground looking for a hot doe. Plainly he is full rut crazed still and his back legs were still wet and dark for pissing down them. He was interested in nothing, except getting some deer tail!


He walked broadside to me at 25 yards and I saw the rack looked good, but brow tines were small. I though should I, he’s also an 8? Then I think, he’s going to cross the creek and someone else is going to kill him. We can’t manage deer on 100 acres when they go on 15 other properties at least. His skull will look good on the garage wall next year! Bang, I pull the triggers and this is where all the excitement started.
This became one of those times you wished you had a video camera running. Ninety-five percent of the time you are in the woods nothing exciting happens. Running a video camera just looked like a good way to mess up the hunt and do two things poorly at once. That is usually what happens when I try splitting my focus on separate tasks at the same time.
I had forgotten all about the turkeys once I saw the buck. They just went out of my mind and I focused on the buck. After pulling the trigger and he was headed to my left and I see him turn around. Smoke clouds my view and I try and move right in the stand to see if I can see him. Trying to focus on this buck intently and I see other motion everywhere! I look up and turkeys are 30′ in the air already. They are flying over me and to the left and right of me. The bedding area is on down slope to the creek and the far side is a 40 degree slope up 80′ or more to the farms on the far side. I imagine they heard the echo of the shot and flew at me and not away as it is the last thing they heard. I am in awe of all the turkeys everywhere, but think where is the buck. Then I see he is 30 yards down hill stumbling and falls over. All this happens in about ten seconds, but it all happened in slow motion in my head as I recall it. Like a 1 minutes reply of slow motion video on your phone. It was like one of those surreal captures they use on TV shows during frantic scenes.
Then I settled in and wait a couple minutes to make sure the buck is dead. I have had a couple collapse and are still alive, but incapacitated. Then I see a lone tom in the bedding area he is still around and he is calling to all the hens. He’s like “Where did everyone go?” and I am there thinking “Are you stupid? Did you not hear the shot and see everyone else fly away?” Then I think he is going to wise up before April and I won’t see a Tom acting this stupid and easy to shoot! They are only this stupid, and easy, in deer season.
It was cold and took him home and broke him down in to meat lugs to rest a day to two before processing for freezer and grinding. As you can see from below. The neck, shoulders and such literally filled one meat lug for grinding. The lid is covering the other with back strap and tenderloins in it. This buck probably has the least fat of any deer I have shot. Late season into the rut and he was burning way more calories than he was eating.

That is all for now. Enjoy!
-
Deer soup – Per quart recipe

I on my last blog I made deer soup, but I had to cook it in the pot to get the flavor down. Then I need to ladle it all evenly into quarts and then pressure can them all. It would be so much easier to mix them in a jar raw packed and just pressure can them. So I worked on a recipe from digging through others and this is what I went with.

The first batch I had two jars fail to seal because I put all the spices in last. The Thyme, rosemary and Marjoram floated right into the seal. The second batch I put in the meat, then bullion and spices and then everything else. Not a single jar failed. I did have some syphoning issues I need to figure out and loosing some liquid.

The ready to eat and use half a quart. Maybe I should make some in pints.

I just warm this in the microwave and I like the flavor.
Then I bake two biscuits from my Homemade freezer collection. Let them thaw on the pan for 10 minutes and then bake at 425 for 12 minutes. I can’t get them working yet in the air fryer and they just burn and get hard on the outside. Good thing biscuits are cheap and I can experiment as the air fryer has a lot more trial cooking attempts to do biscuits. They were great in the oven and in serious need of gravy from the air fryer!
Sorry I did not take more pictures or make a video. Maybe next time and next year. I was experimenting and don’t like videoing with me learning. It is an added distraction to help me screw it up quicker.
Enjoy!
-
Half/half 9mm hollow points

This is a simple one. In my previous post I used pure lead and wheel weight hollow point slugs. The wheel weight performed good shooting but did not expand as I might like. The pure lead bullets expanded very well, but started flying a little at 10 yards and a lot at 20 yards. They would be good inside the house, but outside not so good.

Above we have the wheel weight slug on the left for comparison and the two on the right ate the half and half alloy. The wheel weight lead is about a 10/11 hardness and the half an half about 7/8 bhn.

The back side of the bullets and again the wheel weight slug is on the left. Below is the video testing them.
Enjoy!
-
Stuffed peppers – Freezer style

Hunting season is over and in January started my cooking season. I prepare the venison for bologna, sausages, venison bacon or what ever. This year I am experimenting with ground jerky, soups for canning and canning the rump roast. This one is about using ground meat and making easy to prepare meals. The idea is to have meals I can pull out of the freezer, or jars, and make easy meals.
The idea for this one is experiment with the air fryer and see if I have to thaw them out first, slow cook and then add cheese. I will experiment over the year and make more this summer once the peppers start turning out of the garden again. The air fryer works great for some things, but found recently it was destroying biscuits compared tot he stove. The fan must be the problem, but that is another story to come.

So above is my wife’s modified recipe by me. I increased everything as I thought is was plain and added 1 cup of cooked rice and 8 more ounces of tomato sauce. I made the rice and browned the meat with the onions. Then threw the rice, spices and sauce and lightly cooked it. What I did not do, that traditional recipes call for, if toy par boil the shells before cooking. I had 1/2 pepper shells in the freezer in 2 gallon ziploc’s and just rinsed the ice off them, stuffed them and vac sealed them.

Above is all the meat, rice, sauce and other ingredients ready for stuffing.

Above are the half shells stuffed with the filling and ready to seal. You can see on the right, green one there still is frozen ice on the bottom of it.
The peppers are slide in to 8″ vacuum sealer bags and I have the setting on low. I used a VacMaster 350 which is discontinued. The 360 is out now and a very good sealer for the money. I got mine from Vacuum Sealers Unlimited in California. The owner, Diane, runs deals and sales on Smokingmeats.com message board and has the best deals I can see anywhere. She looks like she is selling LEM now.
I use these bags for all of my vacuum sealing. I get the 2 packs of 50′ rolls as mine has a storage section and cutter for the bags. The 6″ bags, the 8″ bags and the 11″ bags. I use the 6″ bags for snack sticks, small jerky sliced chipped goose and stuff. The 8″ gags for deer steaks, larger jerky, venison bacon and such. The 11″ bags for deer roast, loins and larger cuts.

Finished and ready for the freezer When sealing like above. I had the Vac sealer on low and it is still too much. I had to start it and as it drew all the air out then it starts to suck the tomato sauce out of the filling. I would hit start and move my finger to seals and as soon as the air was gone and push seal. If not it is sucking all the liquid out of the filling. The first one was a mess up past the seal.
I used to have a foodsaver sealer and burnt it out. I sealed so much I burnt the sealer strip up. I do not have that problem with this one, BUT this one will get so hot the bag seal will pull apart like hot cheese and ruin your bag. I get impatient and do this a lot. So here is my trick to prevent that problem and not slow down. I get the sink scrub pad and get it wet. Then seal my bags and as I open the door I rub the wet soft side of the scrub pad over the bag seal on heat strip still. I little steam escapes, the bag and sealer bar cool down. Then you don’t run bags going too fast.
It is even worse when sealing the second seal with the food inside if you go too fast and the bar is too hot. The bag sticks together and the sealer thinks the bag is empty of air and starts to seal it. Then you got a bag sealed with all the air in it still. Then you got to cut it open and reseal, if you have enough bag left. If not, you get to make another bag.
So the plan is to experiment with cooking these frozen, make a lower temperature until I thaw and cook the center and then add cheese to them. Maybe try thawing and cooking and see what works best. I thought if frozen, them might require longer cook times and no par boiling the peppers would let them soften in the longer cook and not be sloppy, but we shall see.
Next up, I’ll be doin similar with Pablano pepper with no meat as a side for deer steaks. If you like the recipe, I’ll add for adding meat to it in the recipe, s I might also next year, if I grow more. Plus 1/2 shell Jalapeno with cream cheese and cheddar and a slice of deer heart in them. Some wrapped in back and some bread crumbs to see what is best.
Enjoy
